Monday 17 February 2014

Poppy Love

I am very happy to present my new teddy, "Poppy Love".  She was inspired by my love of poppies and my love of UK artist Melanie Jayne.  Poppies are one of my ideal flowers, bright, colourful, low maintenance and flowers that always brighten my day.  Poppies, and red poppies in particular, bring me back to memories of the Tuscan hills!

"Poppy Love" measures 21" to the top of her hat but is only 12" sitting.  She is made of plush white mohair with suede paw pads, glass eyes and is fully jointed.  To add extra warmth and character to her face, I tried needle sculpting her nose and muzzle (first time) and am quite pleased with her look.

I took a fun afternoon class on wet felting flowers with local felting artist, Tracy Black, and I was hooked!  Twelve flowers later I knew that they would adorn a green felted "hat" for Poppy.

I hope you enjoy her as much as I enjoyed making this sweet bear.


Pin It

Tuesday 11 February 2014

"The Beaded Doll"

Our doll club, the "Cloth-a-dollics" had a challenge for members to make a "beaded doll".  The dolls were to be revealed at the February meeting.

The first decision is what kind of doll to make.  Well my thought process was this:
  • I had a lot of gorgeous blue hued beads
  • February is traditionally Carnival
  • a kind lady named Linda from the Coast Collective gave me some peacock feathers
  • I love, love making mermaids
You have probably guessed where this is going!  I decided to make a mermaid going to the Venetian carnival.  She was to represent Venice as Venice is also known as "the queen of the sea".   The mermaid would be holding a peacock mask and would arrive on a gondola!

The next step was to assemble some appropriate pictures/fabrics to inspire me:


Print by local artist Jill Louise Campbell
I looked through a book I had on Venice during Carnival.  I loved the Kaufman print fabric and I had a small piece left that I could use for inspiration and to include in the mermaid tail.  I had a mask that I purchased a while ago and a picture of a mask based on peacock feathers, plus a print of Venice painted by a local artist-a good beginning.

I decided to use Arley Berryhill's mermaid pattern (from a workshop taken a few years ago) as the base for my mermaid.  This mermaid is made with plain muslin or cotton fabric and assembled.  It is then painted free hand using textile dyes (Jacquard is what I used).  The stuffed doll body is sprayed with clean water and then the dyes are dropped on the body free hand or with a small brush.
You can see that I used the Kaufman print fabric as my inspiration for colouring the mermaid body, face and arms.  The colours I used were: (Jacquard Texile fabric dye)


  • 111 Sky Blue
  • 114 Turquoise
  • 571 Pearl Turquoise
  • 562 Metallic Olive
  • a Blue Cobalt (Pebeo Setaclor #11)
  • plus a  Delta Ceramcoat Metallic Gold (Gleams)
You can see the finished arms with some lace appliqués that were dyed using the same colours and then applied to the arms with beads. 
I then made the mermaid tail using the Kaufman print and some additional fabrics to supplement as I did not have enough of the print.  Also I wanted a "crazy patch" technique for the tail as I wanted to use her tail as a great base for my beading!


 I then had to decide on how to construct the gondola.  I used a candlestick for the base and then I used cereal box cardboard to construct a gondola shape go go around the top of the candlestick.  I taped the cardboard gondola to the candlestick and then covered the entire thing with aluminum foil.

I used plaster cloth (can be purchased in craft shops such as Michaels) to cover the structure.  The plaster cloth adds a lot of strength and stability and brings the various components together to form the sculpture.  It is a white base and can then be gessoed and painted:

You can see that I glued the candlestick base to a square base board and then drilled three holes for the sticks to represent the poles to which the gondola is anchored when not in use.

Now I went to town with painting the gondola (first sand lightly and gesso to seal the piece):

I painted the gondola in black with gold highlights.  The base was coloured with acrylic paints in different hues of blue to represent the water while the poles are sky blue and bright green with gold accents.  I was very pleased with the finished product.  A added a gloss finish to seal the paint.  Below is a close-up of the base with swirls to represent the waves lapping the shoreline.


I then started to bead!  What fun I had using my beautiful blue beads.  I did fringe, raised beading, random scatter beading, peyote stitch, brick stitch, lazy stitch at perpendicular angles to create a basket weave effect, and so on and so on!


For beading techniques, there are many great reference books but two that I use frequently are:
  • Beaded Embellishment by Amy C. Clarke and Robin Atkins
  • Beading on Fabric by Larkin Jean Van Horn
The masquerade mask is next so I used kitchen towels to draw a shape and placed it against the mermaid's face to get the correct size.  I then used a small piece of ultra suede for the mask base and I beaded away:  Once the beading was done I glued the peacock feathers to the side and then made a felt backing and glued it to the back to cover the threads from the stitching.  I used a small stick as the mask handle which I then beaded using circular peyote.

I also decided that the Queen of the Sea would love to have a beaded amulet purse to carry her mirror and her shells so I made her one:

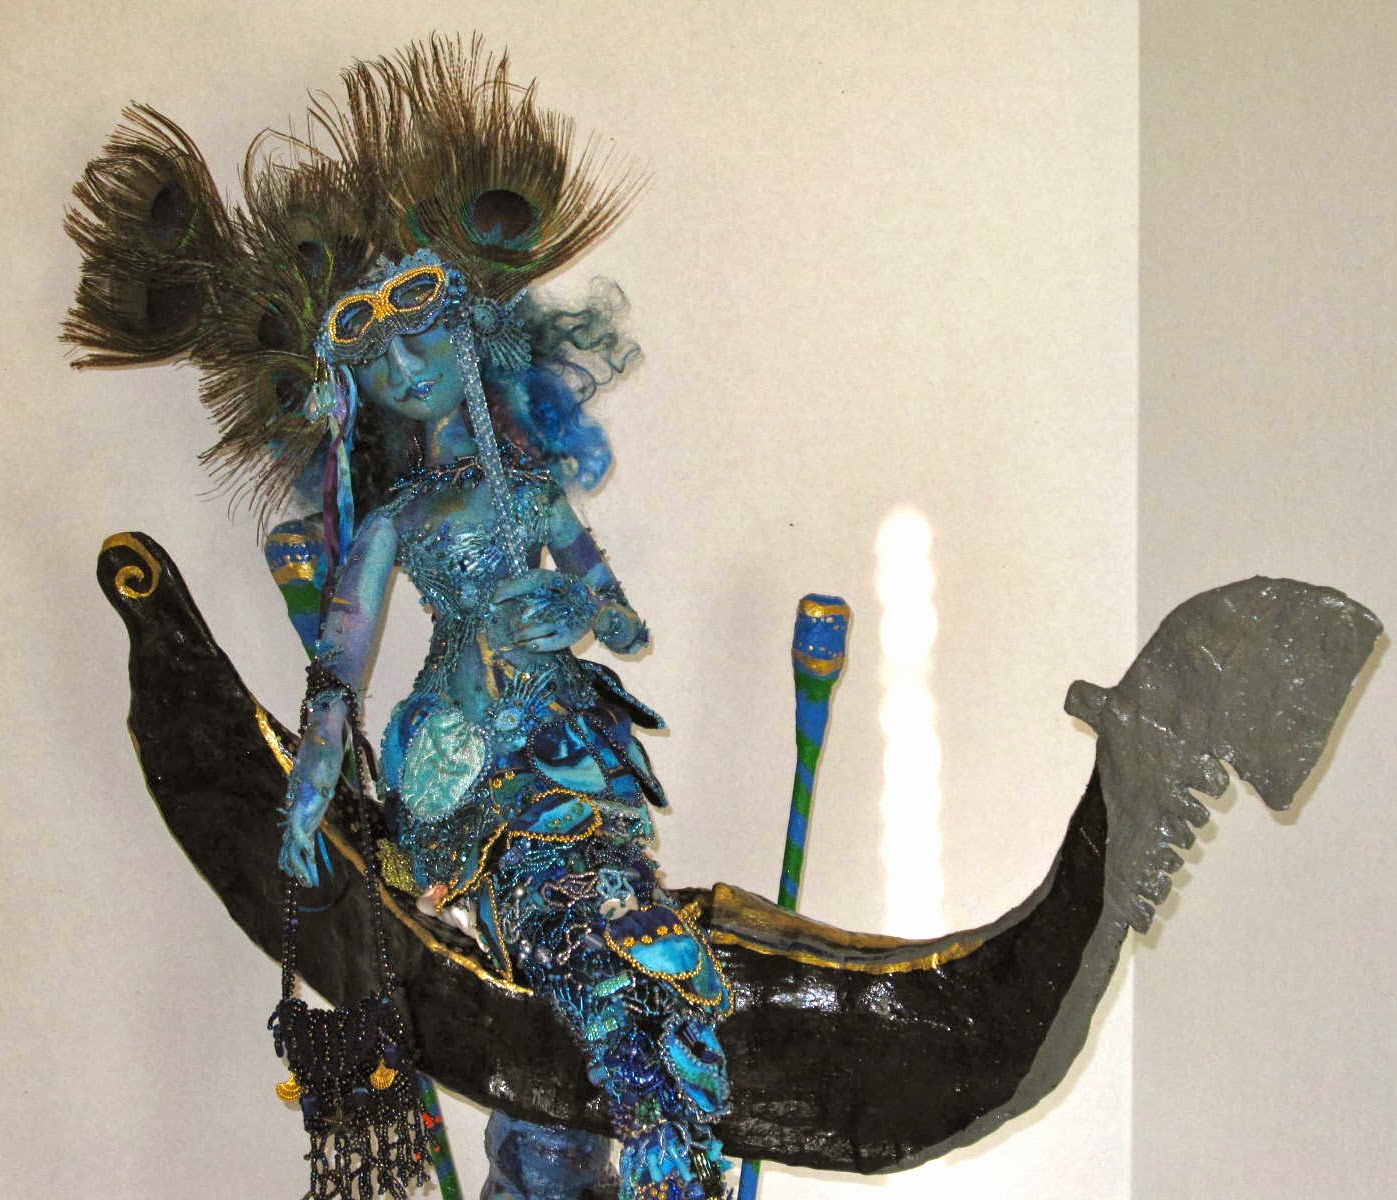
OK, I have delayed just long enough.  I present to you "Venezia, Queen of the Sea":


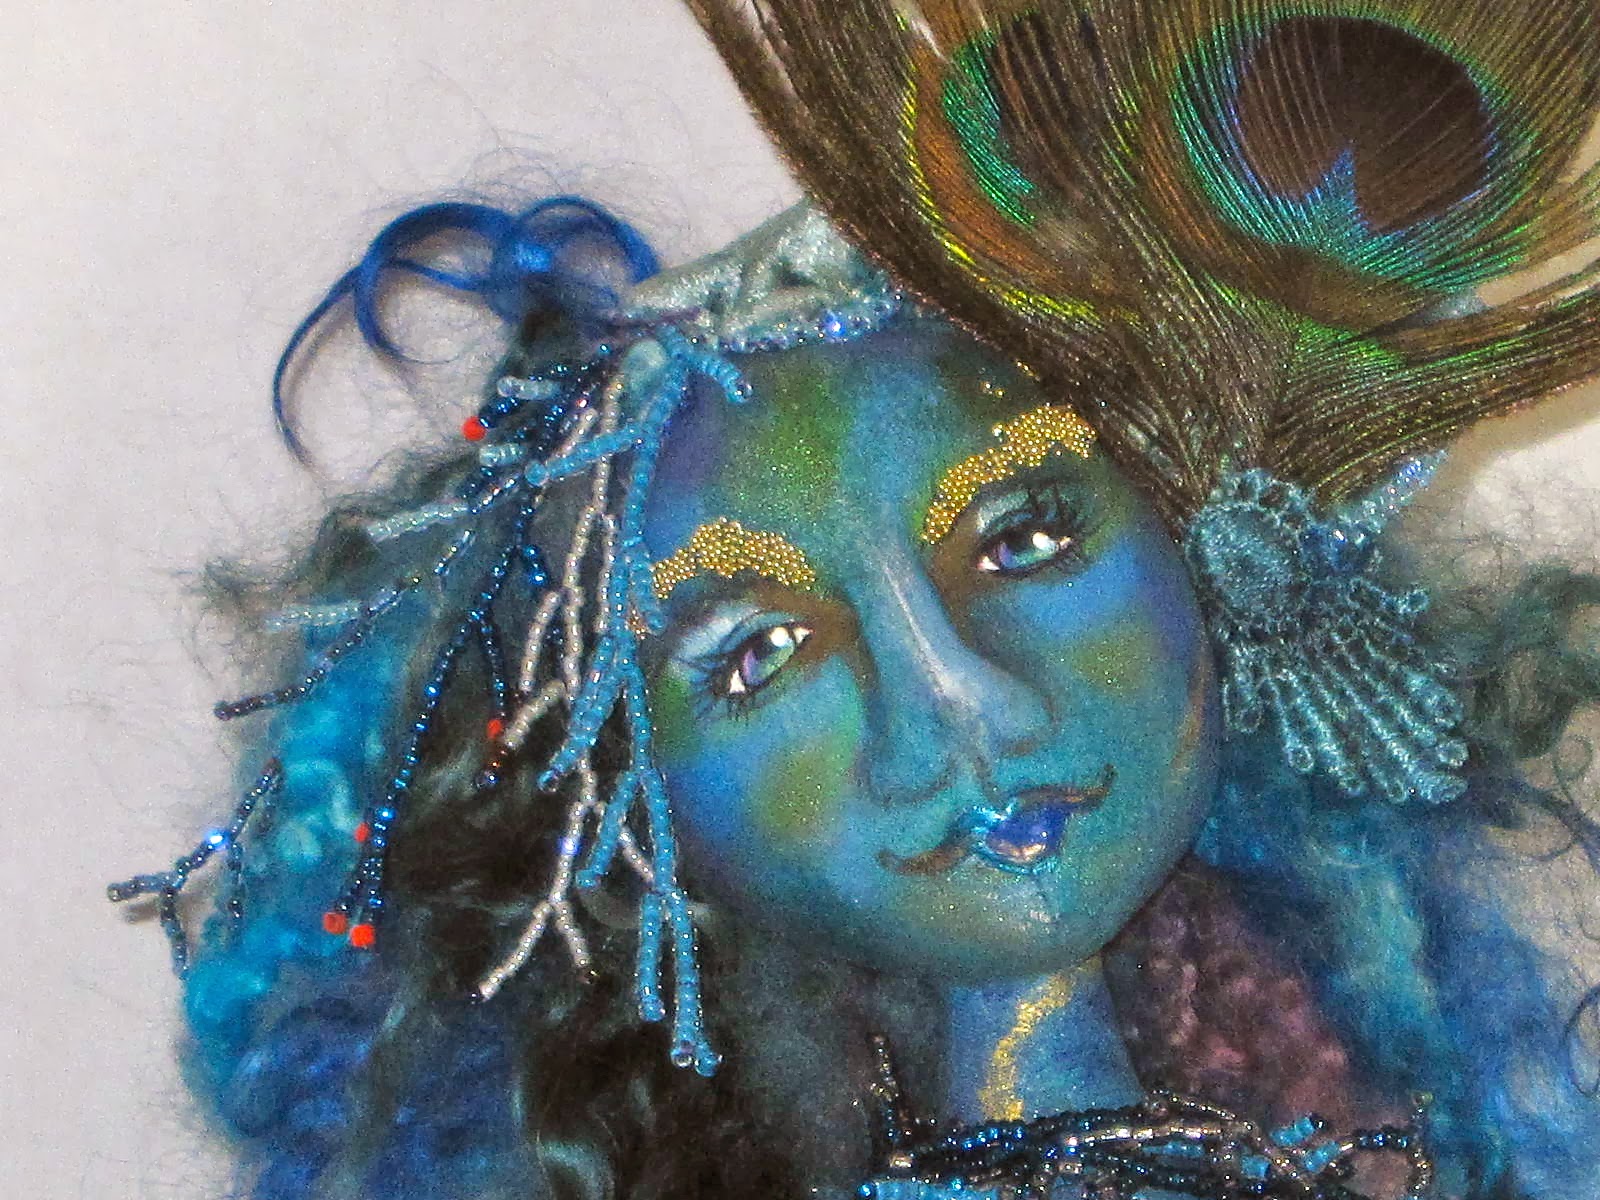
A close-up of her face showing her mohair locks for her hair and her branched fringe adornment.


One final look:
I hope you enjoyed this doll and the process of creation.

Pin It

Monday 3 February 2014

Felted Critters

A couple of years (wow) ago I signed up for a class by Barby Anderson to make a felted bunny and mouse.  I finally dug out the file and tried my hand at dry felting.  I was quite pleased with my first attempts to make this wee bunny and mouse (3.5") plus another wee bunny (3.25") with a crocheted blanket.


A wee mouse carrying her worry doll in her pocket.

Her buddy the bunny with his carrot (3.5")

Together they make a cute pair.

A tiny bunny (3.25") holding his carrot.


The bunny with a hand crocheted blanket.
Here is a parting photo of the cute bunny trio in their Easter cups:


Pin It

Friday 31 January 2014

Happy New Year

To my chinese family and friends, Kung Hey Fat Choi, Happy Year of the Horse.

The Chinese lunar calendar originated with the Emperor Hyuang Ti in 2637 B.C., the 61st year of his reign.  A complete cycle of 60 lunar years is made up five twelve-year cycles.  The one we are currently in, started February 2, 1984, and will end in the year 2044.

The symbol of an animal sign to each of the twelve years is attributed to a legend about the Lord Buddha, who had summoned all the animals to come bid him farewell before he departed the Earth.  Only twelve showed up and, as a token of his appreciation, he named a year for each animal in the order of its arrival:


  • First Rat
  • then Ox
  • then Tiger
  • then Rabbit
  • followed by Dragon
  • and Snake
  • then Horse
  • then Sheep
  • then Monkey (my year)
  • then Rooster
  • and Dog
  • and finally, the Boar
The animal that rules the year of your birth is said to exercise a profound influence over your life.  The Chinese say, "This is the animal that hides in your heart".

2014 is the year of the Horse.

A person born in the Horse's year will be cheerful, popular and quick-witted although the changeable nature may cause one to be hot-tempered, rash and headstrong at times.  The Horse will fall in love easily and may fall out of love just as fast!

Here is my cloth Horse to celebrate 2014:


Pin It

Friday 3 January 2014

First Stuffies of the Year

I cannot believe that we are already well into 2014. Life really is too short! This new year I want to live, let live, laugh and love deeply. I want to let the "bad stuff" of 2013 go and let the best of this year in.

 I am beginning the year with a couple of new stuffed animals; a girly elephant named Tutu and a sweet giraffe called Gilly.
I used an adaptation of a Monica Spicer pattern.
Pin It
I used a pattern from Canadian teddy bear maker Kayrn Ruby.  
Pin It

Monday 30 December 2013

Remembering Past Work

Now that the end of the year is fast approaching I decided to look at some of my past work.  I am sharing a few of my favourite pieces with you.

In 2011 I made a doll based on the theme "embellished".  I used elinor peace bailey's doll pattern "Monique" and then went to town on embroidery, beading, ribbon embroidery and lace and ribbons.  I loved the result and so did a member of my doll club who ended up buying her for a birthday gift for his dear friend.  I was so touched.  It is always reaffirming when someone, other than yourself, falls in love with one of your creations.  I hope you enjoy the photo.  The cats where a lot of fun to add as at the time I had four cats myself (there are three cats beside her and one on her lap).
Pin It

On this same theme, in 2010 I made another favourite doll, this time dedicated to Arizona, Phoenix and Sedona that I visited with a group of fellow "runners"in January 2010.  We went to participate in the Phoenix half marathon and then my friend and I stayed on to visit the Grand Canyon.  As bad luck would have it, the Grand Canyon was snowed in by a blizzard.  We arrived there (bus tour) but the canyon was a white out.  We could not see anything.  Our driver was great as he took us to see a lesser canyon and then on to Sedona.  I loved the beauty of the surroundings and was so impressed by the friendly people we met.  When the doll club had our spring challenge I knew that my inspiration would be Arizona.

Once again this piece is full of beading and embroidery.  The pattern is loosely based on a workshop I took with the talented Elise Peeples. This is a two-sided doll, one side depicts the sun-filled oranges of Phoenix while the other side represents the mystery that is Sedona (all in purples).  I hope you enjoy her (she is in my private collection). Notice the runner in black silhouette on the front of the Phoenix doll.


Last, but not least, is my favourite doll of 2009 based on the "Africa" theme in our June club challenge.  I decided to make an Ethiopian maiden.  This doll was made with cotton knit fabric over plain cotton.  The face was hand stitched to bring out her facial features and then the knit was pulled over her face and held in place with more stitching.  I leaned this technique from the australian doll maker Lynn Butcher.  I loved added her shell adornments and making her hair (crocheted) appear as if it is full of the red clay they use to decorate their hair for special tribal celebrations.  Sadly, I sold her too quickly and I still miss her as she was very beautiful and I was very pleased with how she felt in the palm of my hand.  I hope you enjoy her as well.
The last doll I want to share is one I made for our doll club's 8th birthday.  She is named, "Who say's we can't?".  This doll group is based on the work of illustrator Amy Brown.  I had fun adding her wee imps with the same "can do" attitude:


Pin It

Ornaments Galore

  It is mid October and I have just finished making a gaggle of Christmas ornaments in preparation for the holidays: There are reindeers, pa...