Showing posts with label Workshops. Show all posts

Monday 25 May 2015

Kate Church Workshop Part II

The Kate Church workshop was wonderful and unlike many workshops, students do not have to purchase multiple tools to take the class.  Kate uses a pin with a plastic head, a skewer, a wooden candy apple stick, hockey tape, and a knitting needle.  The only purchased tools needed are three sculpting tools purchased from Kate for the wholesale price ($6-10 depending on the shipping cost) A pasta machine is also very useful but not essential.

As promised, I am sharing photos of the progress of dolls from members of the workshop other than myself.  I was not able to take everyone's photos but I cannot wait to see all the finished characters as everyone's dolls were looking great by the end of the week.

This is by Jenny, as a tribute to her husband.

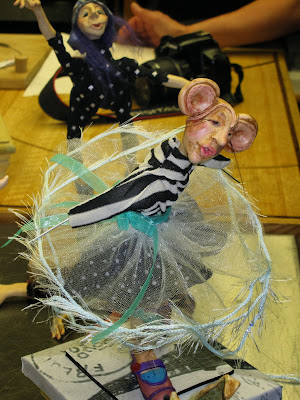
This will be a wee mouse girl in Paris (by Marla)  The wee witch in the back is by Michele.

This will be a bunny girl (by Marla)

The hair is made from clay as is the ice cream. (by Paula) The old man and "young un" in the back is by Lynn

This elegant lady is by Gail.

This is my favourite piece, made by Paula (his headdress is in clay) The colourful shoes in the back are by Bobbi.
I did not take photos of the rest of the dolls (some were not at the point that they wanted their photos taken)

Now my second finished doll is made with a sitting body suit that is filed with plastic pellets and polyester filling.  Unlike the first character it is not fully wired as I wanted to retain the floppy, tender look.  Since this was the first figure that I started in class, I choose to give her one shoe and try my hand at sculpting a foot (as suggested by Kate Church and as many people did with great success).

I completed the costuming in class except for her teddy bear (2", handmade by me).  I decided that she was not right for the base that I brought to the class so I made another base at home and sewed a "faux" fur rug for her to sit on.  I am pleased with her tender look.
Back of then wee doll
The wee teddy is 2" tall and hand made by me.

I used ModPodge to add the colour (using napkins) and the phrase "Tender Moments"

Enjoy!

Sunday 24 May 2015

Kate Church at Blue Moon Winery

What a wonderful week I have had in Courtney BC with fellow doll makers taking a Kate Church 5 day workshop!


Barb and I took walks before breakfast  by the Puntlege River

There were seven of us from the Victoria doll club (Cloth-a-dollics) in a group of twelve.  Marla of Blue Moon Winery was a wonderful hostess and provided a great space with yummy lunches and snacks every day (from a local chef).

Here are some scenes of the venue:


Rosie the sweet "guard" dog.

Table set for our Thursday night banquet in the backyard of the winery.

Kate was an excellent teacher giving us step by step instructions on sculpting the head in polymer clay and giving us individual attention as needed.


Here is the start of my two heads.

Now they have mouths.
Examples of other heads-similar but all different!

Makeup is used for adding colour to the wet heads.

Kate's demo doll in progress
Hands, feet and ear.


Shoe demo-so much fun.
Heads coloured and ready for the oven (250-275F for 30 min)

I knew that one of the dolls I wanted to make was a Pipi Longstocking character.  I have always loved this Swedish story about an adventurous little girl with red pigtails and a pet monkey!  I was so pleased with the final result:


Pipi (titled Monkey and Me)

Here she is with her cloth monkey (made by me).
I covered the base with fabric and crocheted orange flowers.
I loved making Pipi's costume with her coloured mis-matched stockings, big, floppy shoes, frock full of patches and her red hair with pigtails sticking out (wired to stay in place).  The doll is all polymer clay with an internal armature so enable the pose.  The clothing is fabric and the hair is mohair locks.  The monkey was made using upholstery fur with hand colouring details.

Next post I will show my second doll that is a slimmer doll with a floppy "pellet" filled body.  I will also show some of the other student's work in progress.


Pipe says good-bye for now.

Sunday 9 March 2014

Princess Sophia

As promised, I am presenting Princess Sophia, made in a workshop with the New Dutch Touch.

I decided that being an Italian Princess meant that Sophia needed earrings, so I pierced her ears and gave Sophia gold and diamond hoops.  The princess decided to wear her pearls and her bracelet for her portrait.  In addition, she wanted a wee bit more trim around her sleeves and pantaloons (she is innocent, but a wee bit demanding).  She asked for tiny gold trim at the edge of her shoes, and I gladly obliged.

Finally, Princess Sophia was thinking back to her wonderful week at the Blue Moon Winery in Courtenay, BC and she was missing her "sisters in spirit" so I decided to make her a royal art book filled with pictures of the other Princesses.  She was so delighted that she now holds  her book on her lap and will not let it out of her sight!

I hope you enjoy my little Princess, I know I do and I hold the memories of my week in Courtenay close to my heart.


Pin It

The New Dutch Touch

I am so excited that I just finished a glorious week learning from Ankie Daanen and Marlaine Verhelst along with 11 other enthusiastic doll makers!

The week was organized by Marla of Blue Moon Winery in Courtenay, BC on Vancouver Island. The weather was typical west coast with gentle rain and gray skies (normally it is much drier at this time of year) but nothing could dampen our fun.


Ankie and Marlaine were such fun and very good teachers.  We started with an oval ball that was covered in a thin layer of paper clay and then we started to build our "little princess".

This is a fairly new class for them and is a departure from the emphasis on heavy costuming.  This doll has a paper clay bodice that can be decorated and painted as part of her outfit.


Painted heads (with watercolour paint) waiting to dry
As you can see, although we were following the same steps for building her face, all the heads are unique depending on the slight differences in the size and placements of the features, just like us!

The paper clay was fun to work with as it was supple and could be smoothed with your own fingers and water.  We did have paper clay tools that we used as well.

The most challenging part was learning how to build slowly by adding clay and them smoothing well to blend the added clay into the face.  The little hands were the hardest part for me!

The bodice was easy and fun to decorate.  Some of us used a stamp to emboss the clay, others a piece of lace and still others embedded metal bits into the bodice so that they would adhere once the clay dried.
Face in progress

Face a little further along

Bodice with embossing using a stamp
I cannot describe the fun and positive energy that I received from spending an entire week immersed in creating a little doll with like-minded ladies!  Marla, our host was so gracious and showed us her past work and her wonderful marionettes.  Snacks, tea and coffee were available all day long and a local chef, Laura made us the most tasty lunches using organic, local produce. Marla provided her local berry wine.  This is my idea of heaven, creating, laughing, eating and drinking surrounded by the positive energy that is in all of us!

Here is a group portrait of the little princesses:  They once all lived in the same magical kingdom and then met their special someone and moved a little bit away to a castle of their own making.  The little princesses were determined to  connect at least once a year with their sisters in spirit and share their varied and eventful lives in the peaceful setting of Vancouver Island.

I will add my little princess' solo picture a little later as soon as she receives her special book and necklace so stay tuned!

Our host Marla was not able to take the class with Ankie and Marlaine and was very sad so her friend Angie suggested that if there was time, perhaps we could build her little princess for her together.  We thought that was an excellent idea and so it happened that Marla too had her own little princess with bits from many hands including mine.  Here she is wearing Marla's favourite colour, sky blue:

Marla plans to have Ankie and Marlaine back in 2016.  I can hardly wait!  Bye for now.
Pin It

Ornaments Galore

  It is mid October and I have just finished making a gaggle of Christmas ornaments in preparation for the holidays: There are reindeers, pa...