Monday, 25 May 2015

Kate Church Workshop Part II

The Kate Church workshop was wonderful and unlike many workshops, students do not have to purchase multiple tools to take the class.  Kate uses a pin with a plastic head, a skewer, a wooden candy apple stick, hockey tape, and a knitting needle.  The only purchased tools needed are three sculpting tools purchased from Kate for the wholesale price ($6-10 depending on the shipping cost) A pasta machine is also very useful but not essential.

As promised, I am sharing photos of the progress of dolls from members of the workshop other than myself.  I was not able to take everyone's photos but I cannot wait to see all the finished characters as everyone's dolls were looking great by the end of the week.

This is by Jenny, as a tribute to her husband.

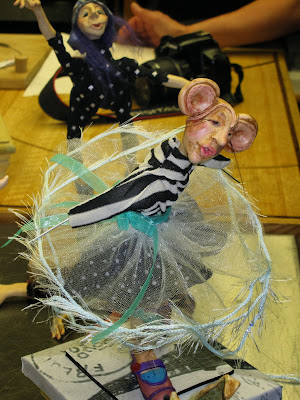
This will be a wee mouse girl in Paris (by Marla)  The wee witch in the back is by Michele.

This will be a bunny girl (by Marla)

The hair is made from clay as is the ice cream. (by Paula) The old man and "young un" in the back is by Lynn

This elegant lady is by Gail.

This is my favourite piece, made by Paula (his headdress is in clay) The colourful shoes in the back are by Bobbi.
I did not take photos of the rest of the dolls (some were not at the point that they wanted their photos taken)

Now my second finished doll is made with a sitting body suit that is filed with plastic pellets and polyester filling.  Unlike the first character it is not fully wired as I wanted to retain the floppy, tender look.  Since this was the first figure that I started in class, I choose to give her one shoe and try my hand at sculpting a foot (as suggested by Kate Church and as many people did with great success).

I completed the costuming in class except for her teddy bear (2", handmade by me).  I decided that she was not right for the base that I brought to the class so I made another base at home and sewed a "faux" fur rug for her to sit on.  I am pleased with her tender look.
Back of then wee doll
The wee teddy is 2" tall and hand made by me.

I used ModPodge to add the colour (using napkins) and the phrase "Tender Moments"

Enjoy!

Sunday, 24 May 2015

Kate Church at Blue Moon Winery

What a wonderful week I have had in Courtney BC with fellow doll makers taking a Kate Church 5 day workshop!


Barb and I took walks before breakfast  by the Puntlege River

There were seven of us from the Victoria doll club (Cloth-a-dollics) in a group of twelve.  Marla of Blue Moon Winery was a wonderful hostess and provided a great space with yummy lunches and snacks every day (from a local chef).

Here are some scenes of the venue:


Rosie the sweet "guard" dog.

Table set for our Thursday night banquet in the backyard of the winery.

Kate was an excellent teacher giving us step by step instructions on sculpting the head in polymer clay and giving us individual attention as needed.


Here is the start of my two heads.

Now they have mouths.
Examples of other heads-similar but all different!

Makeup is used for adding colour to the wet heads.

Kate's demo doll in progress
Hands, feet and ear.


Shoe demo-so much fun.
Heads coloured and ready for the oven (250-275F for 30 min)

I knew that one of the dolls I wanted to make was a Pipi Longstocking character.  I have always loved this Swedish story about an adventurous little girl with red pigtails and a pet monkey!  I was so pleased with the final result:


Pipi (titled Monkey and Me)

Here she is with her cloth monkey (made by me).
I covered the base with fabric and crocheted orange flowers.
I loved making Pipi's costume with her coloured mis-matched stockings, big, floppy shoes, frock full of patches and her red hair with pigtails sticking out (wired to stay in place).  The doll is all polymer clay with an internal armature so enable the pose.  The clothing is fabric and the hair is mohair locks.  The monkey was made using upholstery fur with hand colouring details.

Next post I will show my second doll that is a slimmer doll with a floppy "pellet" filled body.  I will also show some of the other student's work in progress.


Pipe says good-bye for now.

Thursday, 14 May 2015

Little Red and the Wolf

Last night at our Cloth-a-Dollics  meeting, we shared our dolls made based on the theme "Fractured Fairy Tales".  There were eleven dolls shown, all wonderful and creative.  My contribution was based on "Little Red Riding Hood", the classic fairy tale.  In my version Little Red becomes very frustrated with the townfolk chasing the wolf and with the wolf creating havoc in the woods so she uses her brain and comes us with a plan:
Little Red is 16" tall.  I especially loved making her cape and red boots.


Little Red says to the Wolf, "Wolf I will bring you a picnic basket full of food every week if you agree not to frighten any more little girls or grandmothers.  The twofolk have agreed that they will not chase you as long as you stick to this plan.  What do you say Wolf?"

The Wolf decided that it was a very good plan indeed and even accepted the special tie that Little Red gave him to show him and everyone that he was serious about keeping his word.


To this day Little Red, who is now town mayor and known as Big Red, meets with the Wolf (who is still wearing his tie) every week and together they have a picnic and discuss the week's events.  They have become fast friends and help each other solve problems both in the town and in the forest!


 The moral of this story is, negotiate and try not to devour strangers, as they may become friends when given a second chance!


Tuesday, 24 March 2015

Fairies, Fairies, Fairies

I will be participating in an artisan market at the Coast Collective called "Enchanted Forest" that will take place on Sunday, May 10th (Mother's Day).  I decided to make a few fairies as I love them and they are popular with many here on the West Coast.

I decided to use a pattern by the talented Karen Shifton (Damsel).  It makes a 10 inch fairy that is very adaptable as there is a choice of arms and legs.  Of course it is the finishing touches that makes this wee fairy unique.

I have named my fairies "Flutter FrouFrou Fairies" as they all have butterfly wings and enjoy acquiring "fancy stuff".  I love the way each fairy took on its own personality and I had great fun coming up with a wee bit of stuff about each one!  Without further ado here they are:  I cannot pick a favourite but do you have one?


Sweet Pea is the only one that has feather wings (she loves feathers!)


I hope you enjoyed my fairies.  The wings are made by either painting front and back with butterfly wing or using the Inkjet printer and printing on fabric some butterfly wings.  The wings are then cut out and a wire armature inserted (26 gauge) then the front and back are glued together.  I added several coats of Mod Podge and then some glitter for the fairy shine.

Notice that they all carry a single piece of bling (a loose earring) and they all carry a flower and ribbon.  Each has their own personality.  I would highly recommend this fun pattern.

Ornaments Galore

  It is mid October and I have just finished making a gaggle of Christmas ornaments in preparation for the holidays: There are reindeers, pa...