Tuesday, 2 May 2017

Saanich Peninsula Arts and Craft Show 2017 (SPAC)

I was so excited to be asked to be the guest artist at the Saanich Peninsula Arts and Craft Show in Sidney, BC. It is rare that I am able to display all my art dolls in one venue as I have been very prolific over the past 25 years.


The show took place this past weekend with patron's evening on the Friday.  It was a huge success!  The quality of the art work was amazing.  There were paintings of all media, sculptures, steampunk, pottery, jewelry, basketry, weaving, glass work and porcelain.  As guest artist, I was able to use the entire stage at the Mary Winspear Centre in Sidney, BC and I interacted with the guests telling them stories about my dolls.


It is so rewarding when new people are exposed to art dolls as they had no idea that this art form even existed.  One woman made sure to tell me that when she heard that the guest artist for the show made "dolls" she was expecting her grannies rag dolls or "scary" porcelain dolls, but my dolls she exclaimed, were "fantastic" and nothing like she had ever seen before.  That one comment was priceless.  I told the guests about our local doll club and about the Coast Collective Art Centre where some of my pieces are on display.  It was great fun.

Here are more photos of the event:


Now for a sampling of some of the talented artists at the show:


There were so many wonderful works of art that this is just a small sampling.  If you are on Vancouver Island, it would be well worth keeping your eye on the SPAC web site to find out dates for next years show.  I hope you have enjoyed the quick peek of this year's art.

Monday, 20 March 2017

Easter Bunnies

It is the first day of spring-yeh!

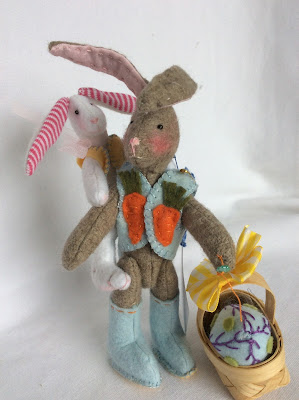
I have made a dozen wool felt bunnies to celebrate spring and Easter. The bunnies are 8"tall from the foot to the end of their bunny ears! Please enjoy them as they are going to the Coast Collective Art Centre this Wednesday and are for sale :


One of the bunnies is for a very special person in my life and I hope she enjoys it when it is gifted.  Enough said!


Thursday, 16 March 2017

More Mermaids Swim In

Well, as many of you know, once I start on a theme, I work in groups.  Once I finished my first mermaid piece, I started making another and then another.  I am presenting them now. 

The second mermaid, I call "Deep Waters".  She was inspired by the luscious embroidered black fabric that I had in my large stash.  I used Arley Beryhill's mermaid pattern as the starting point.  I used a cotton batik fabric for the flesh tones of her skin and then "skinned" her face after needle sculpting  (the technique I learned from Angela Jarecki).

I was very pleased with the results!  Next came the finishing touches of beading and trims, hair and her glamour mirror and a lovely shell seat.  Here she is:


Next, I wanted a full-figured mermaid.  Mermaids come in all shapes and sizes too!

I choose a pattern by Cyndi Mahlasdt (I took a workshop with her in the early 2000's).  I used a "doll skin" fabric (stretchy) for her skin and a bathing suit fabric for the body tail.  I just love this full figured mermaid gal:

I went to town on her embellishments, especially on her tail fin, back and headdress:

Tail fin with organza free-motion embroidery and hand beading plus added shells

Back with rouched and beaded trim and hand-dyed gauze shawl

Her face has purple glass eyes with added eyelids and nose details for that deep ocean fishy look.
Can you tell that I love to add details to my work?  Of course this mermaid "Amethyst" demand, in her gentle come hither way, to have a shell throne and I complied. 

I mad the throne using a wooded chair that was past it's prime (broken legs and spines) and used wire to reshape it into a throne.  I covered the chair and added shape by adding aluminum foil.  I then used plate cloth (available in craft stores) to cover the entire throne with strips of the cloth to strengthen the structure.  I waited for it to dry and then painted it and used celluclay (craft stores again) to add shells and pearls as part of the throne:


Back of throne showing velvet butterfly and organza seaweed

Side view showing embedded shells.
Well, I loved, loved making my mermaids and they will be featured in a local fine art show at the end of April (April 28-30) here in Sidney, BC.  I am providing the link to the show should you be in the Greater Victoria area and want to visit my mermaids (and many more pieces!).
http://spacsociety.com/member-benefits/spring-show/

Bye for now and hope to see you at the Saanich Peninsula Arts and Crafts Society Fine Arts Show.

Friday, 17 February 2017

Marina and Gemma

I often sign up for online classes as I love learning new techniques.  But, I do not always make the doll during the online class, lol!  Recently I decided to tackle an online class that I had signed up for a year ago, a mermaid by Angela Jarecki, called "Enkai Nou", Japanese for deeps or ocean, gift or memory.  My mermaid piece is called Marina, Italian for sea and the child is Gemma, gift or jewel.

First I picked my fabrics:


I loved this colour palette, so bright and lush. I decided to use the back fabric with the circular motif for the tail and the other two for the fins. Next I had to dye some cheesecloth as Angela directed using Rit dye:


I then tacked the head using a batik fabric to add depth to the face.  I needle sculpted the head (eyes, nose and mouth).  I admit that the face looks a bit weird at this point but I know from experience that this will be a good face:


Now I went to town beading the mermaid tail and fin.  I also added real shells to the piece. 

 I then "skinned" the face to cover the needle sculpting and coloured the face using mostly watercolour pencils (some permanent marker and some acrylic paints).  I added a touch of dimensional glaze to the eyes and mouth:


Notice that I made the child mermaid as well.  The eyes on the child are farther apart and the face has less colouring than the mamma mermaid.  I used the same fabrics for both dolls, just in a different order.  I love the way they turned out.


I hope you enjoyed this duo as much as I enjoyed making them.  I love online classes as I always learn so much and it stimulates me to create!
SaveSave

Saturday, 4 February 2017

Frida Kahlo II

2017 has started with a lot of sadness and sorrow.  In the span of two weeks I lost my beloved mom (aged 86) and a dear friend (aged 77).  I took solace in my creative life and I made a second Frida.  I call this new piece, " Embrace the Shadows"

In life to fully appreciate the light, we must embrace the shadows-the sorrowful, the dark can have great power.  But if we embrace the shadows and remember the light and joy that our loved ones brought us, then we can continue to celebrate life and our loved ones by embracing all the rich tapestry of our life and our surroundings.

I started with the candlestick, which I purchased many months ago during the Halloween season.  At the time I was thinking only of Halloween but now the candlestick symbolized so much more:


Time is precious and death is the final call for us all.

I used Arley Berryhill's pattern, "Candlestick Diva" as my starting point.  I wanted a larger head to emphasize the shadowy side of Frida.  I had purchased the fabric a year ago with a Frida doll in mind, and it was perfect for the skirt.  The iconic Mexican folk print celebrates life and brings hope to the piece.

Frida's hair is black yarn, braided in her typical Mexican folk art style.  I added crocheted flowers to the back along with black feathers to symbolize sorrow.  
Back of Frida's head showing flowers and feathers in her hair
Frida stands 25" tall and so has quite the presence.  I am very pleased with the finished piece and it helped bring joy back to this dismal year!  I hope you enjoy her.


The three crows are made from black velvet and her earrings are a nod to the day of the dead.

Ornaments Galore

  It is mid October and I have just finished making a gaggle of Christmas ornaments in preparation for the holidays: There are reindeers, pa...