Sunday 13 July 2014

An Embroidery Refresher

This past Saturday I took a refresher beading course with a local talented header and teacher, Eileen Neill (Qualicum Beach, BC).  It was a fantastic day, so much fun.  We learned how to do some basic outline stitches (lazy stitch and couching stitch), three kinds of picot edging stitches, some fancy stitches (like spider web), all kinds of fringe, and the lacy netting stitch.

The sampler we made is about 4.5" square.  I took pictures of some samples that Eileen Neill made:  (Our homework was to make the base fabric square, ready for beading).


Here is my finished piece which I am calling "Fantasy Garden Delight":

Eileen Neill also teaches peyote work.  She has done a lot of pieces with Tyvek and burning techniques which produces interesting work.  Beading is such fun and if I were not so busy making dolls, I would surely be a beader!

Here are some of Eileen's "burned" pieces:

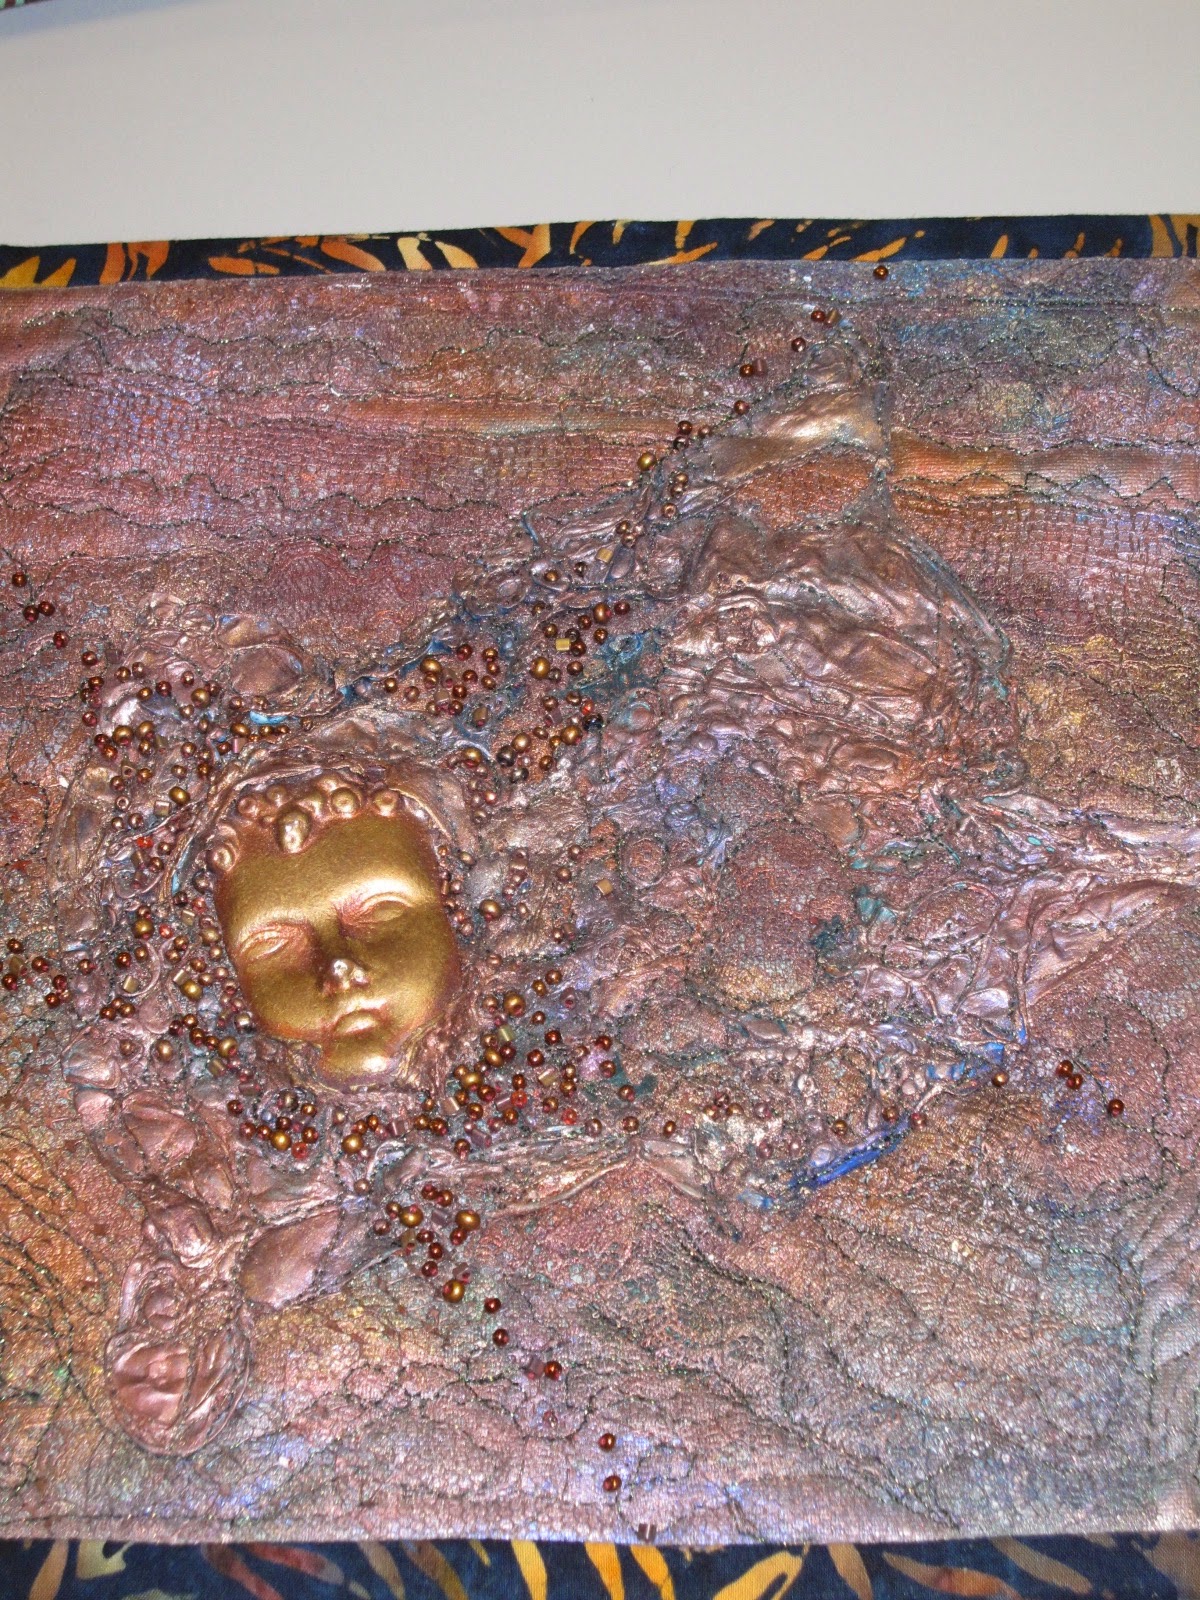
The face has been stamped, tyvek, burning and beading plus metallic paint

This uses a face mold, tyvek, burning with heat gun.


This is made by using a plastic bag (frozen berries) and using the heat gun before sewing with netting.

Eileen does not teach the burning technique as it emits fumes indoors and must be done in open air.  Here are three final beaded squares all made by Eileen:  Notice that on all the squares the base fabric is batiks as they have interesting colour combinations and are a nice tight weave.  Eileen uses doubled "Coats Dual Duty" hand quilting thread, treated with beeswax (to strengthen) followed by Thread Magic (to lubricate) for the beading thread.  This thread does not fray like Nymo does when beading cloth.  This class was originally developed for quilters that wanted to incorporate beading into their quilts but works equally well for doll makers.


Monday 7 July 2014

Esmerelda and Spook

Pin It
Well, it seems as if I am designing for the holidays.  You have seen my Santa and now it is time for Halloween.  

A very special lady requested a witch for Halloween and as I will be very busy this summer, I decided that the best time to make the witch is now.

I must admit that once I start on a project, I cannot stop until the end.  First I looked through my patterns for witches and choose one by Kate Erbach (Phat Phaeries Inc.) to use for my vision.  

I wanted to make the witch green with very prominent eyebrows and lashes.  I wanted black velvet boots and a cool cat and a funky broom and a wicked, wicked hat.  I assembled all my fabrics (all those I thought I might use), trims, bobbles etc for the project and then went right to work.

This project took two weeks from start to finish.  Her stand was a challenge as I wanted her to perch on a stand with her broom but she was to also be able to hang (fly).  When the doll was done, I went to the local hardware store and looked around.  I found what I needed in a metal plant spike (the metal ones for the garden that have a round metal top for vines to grow through).  I got the store to cut the spike to 16" (it was 24" to start with) and I took it home.  I then drilled a hole on the base (already painted with added paper clay pumpkin, mouse, black net and spiders) and then inserted the spike.  It worked but I had to add some metal wire for the back so that the top would have a seat for her to perch on.  I then cut strips of fabric and covered the entire wire so that the piece would fit in.  Finally I used fish line to place a hanger on the witch so that if the owner wanted she could hang her with her broom.

Here is Esmerelda and her kitty Spook:  The kitty at the base is not staying with this piece. She is 30" high and 28" across with her broom.


A close-up of her face: I used halloween fake lashes for her eyes an drew her eyebrows to look like a black tree.  She has two warts made of green wool with black thread.  Her hair is a mixture of fibbers including tiny braids that have bats in them.
The hat is black velvet with all kinds of fun stuff on it, including skulls, spiders and even a black kitty button:
Her side profile (notice her skull necklace with her "secret" key.  She also has a bat necklace of course)

Back view showing a peak of her bat wing on her back that helps her fly.


I hope you enjoyed her!

For my Mom

In just over a month I will be heading east to Toronto to visit my family.  I am very fortunate to be there for my mom's 84th birthday in September.  My mom last visited me here in Victoria a few years ago and she loved the flowers at the beautiful Butchart Gardens as well as the city of Victoria's lamp post flower hanging baskets.

I wanted to make her a wall hanging to celebrate her birthday and her visit here in Victoria.  I decided to make her a wall hanging designed by local artist Susan Teece.  The wall hanging is 16"x26".  It was very easy to do as all the flowers were made using fusible web and then ironed on the background fabric.  The quilting is done using free motion stitch with variegated thread.    I used my printer to print a couple of photos of my mom that were taken at the Butchart Gardens here in Victoria. On the back of the quilt I added a photo of the two of us.  The photos were printed on fabric using an inkjet printer (very easy).

I am sure she will love her gift.


Tuesday 1 July 2014

Cats, Cats, Cats

I am stuck on cats at the moment.  I love working with felt and doing hand embroidery once in a while so I took the online class (Phat Cat) by the master, Cristen Brown.  I could not make just one of these little pillows (about 8" across) so I have made many!

Since this is Canada Day, they insisted on having their photo taken with the flag.  Meet Buttercup:
 Here is the cuddly "Princess":
Meet Scrappy, the calico cat and scruffy.  Scrappy has her back turned, silly thing:
Then there is the shy "Bluebell":
We cannot forget Missy, the Siamese cross or she will be annoyed!
Finally, here are the three amigos (Buttercup, Bluebell and Scruffy), together in their basket.
These wee kitties were fun to do and I got to use a few of my many buttons!
Pin It

Happy Canada Day

Happy Canada Day to everyone out there.  It is a beautiful day here in Victoria, 25C, blue skies and sunshine.  We went for a lovely walk along the Gorge waterway and enjoyed the classic cars on display plus the "Gorge on Art" festival.

I have just finished my Canadian Santa called "Northern Flight" from a design by the talented Canadian artist Becky Holloway.  He has just flown over the northern shores of Hudson Bay and has left his sack of gifts for the little ones.  His ride is not on reindeer, for he is in Canada, eh, so he is on a Canada goose!  


 This piece is about 26" tall and 22" wide and all cloth.  The goose is stuffed (ha, ha) and gessoed and painted.  Santa is also all cloth with red velvet Santa suit and fur trimmed mitts (all hand made).  The santa boots were ornaments but his snowshoes are handmade.


Have a wonderful Canada Day and remember that we are less than six months away from Christmas!
Pin It

Thursday 19 June 2014

Pin Keeps

I have always love pincushions or pin keeps and so I thought I would get busy and make a few for the Coast Collective gift shops.

Since I love making mini bear/animals I combined my two loves and made several pin keeps.  I am sharing the results of my twisted mind.  Most of the pin cushions are stuffed with polyfil and crushed walnut shells (good for sharpening pins).  The pincushions themselves are either velvet, wool felt or velveteen to add texture.

First are two wee Siamese twins, Kalie and Kate.  They sit proudly on their pincushions that is adorned with hand crocheted flowers. 


Next is a shy mouse that sends his love.  This is a design by the talented Monica Spicer. This wee fellow stands on a velvet pin keep.


Now for the country mouse who proudly stands a top a plump velvet tomato pincushion:


We now travel to another continent and have Gentle Gerome the shy giraffe and pesky Marcel the monkey:  Marcel has a pin box attached which he thinks will be quite handy!


To round out the gathering of animals, I included two delightful pin keeps made from a Cheswick design, bunny and Ellie the elephant:


Finally, to wave goodbye to this group I went back to the west coast for inspiration and made a wee mushroom folk atop his wool felt pin cushion:  This wee mushroom pin keep can be hung as an ornament as well. After all, not everyone is a sewer!


Pin It

Ornaments Galore

  It is mid October and I have just finished making a gaggle of Christmas ornaments in preparation for the holidays: There are reindeers, pa...